I know it's been months since I've updated. So much has been going on! Back in July I traveled to Montreal, and spent a short while recovering from that trip before moving onto my next venture in August, which consisted of running back and forth between cities in an attempt to land a spot on a television show. We eventually got to tape the show, but more on that later! Maybe.
Last week I designed a few more topcoats; pictures and swatches coming soon. Also, I have bought almost three dozen new types of glitter, the most recent of which arrived in the mail yesterday, and I'm looking forward to incorporating them into new creations.
Stay tuned!

Tuesday, November 5, 2013
Saturday, June 29, 2013
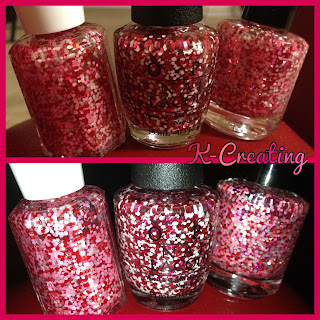
Red, White, Pink: Revisited
I liked my red, pink, and white "dotted" topcoat so much that I just had to make another! However, this time, I made a few changes. I used metallic pink AND metallic red hexes in addition to the frosted white, matte pink, and matte red. The difference is subtle, but still noticeable.
This is both polishes under flash. The new version is on the left, and the original version is on the right:

This shot is no flash:

I actually did the second version (on the left) over a week ago. Only I'm just now getting around to showing it! I wore it the same day, but I didn't take pictures. The next time I wear it I will.
By the way, I broke down and bought Minnie Style. I just had to!
Comparison shot, with and without flash, of Minnie Style and the polishes it inspired:
Yet, at the end of the day, I think I like mine a little more.
This is both polishes under flash. The new version is on the left, and the original version is on the right:

This shot is no flash:

I actually did the second version (on the left) over a week ago. Only I'm just now getting around to showing it! I wore it the same day, but I didn't take pictures. The next time I wear it I will.
By the way, I broke down and bought Minnie Style. I just had to!
Comparison shot, with and without flash, of Minnie Style and the polishes it inspired:

Yet, at the end of the day, I think I like mine a little more.
Thursday, June 13, 2013
Red, White, Pink
OPI has a gorgeous polish out right now called Minnie Style. I mentioned it here before, and posted a manicure "inspired" by it. Made up of red and white glitter, it's different from most glitter polishes. I thought about buying it, but being it that I already have a ton of red and white glitter, I decided to make my own version.
Minnie Style, pictured below, has matte white and metallic red hex glitter, although some people seem to have gotten bottles containing white square glitter.

And it's really pretty.

Minnie Style, pictured below, has matte white and metallic red hex glitter, although some people seem to have gotten bottles containing white square glitter.
However, I decided to play around with a few glitters and I made a version that has frosted hex glitter instead of opaque, matte red hexes instead of metallic, and matte pink hex glitter.
I swatched it over several magenta, red, and pink polishes, and I finally settled on a color to use as an undie--Party Pink by Ruby Kisses.
My version, unnamed, shown below with and without flash.

It wasn't my intent to create an exact replica, so I love the way it turned out. It's a keeper!
Sunday, June 2, 2013
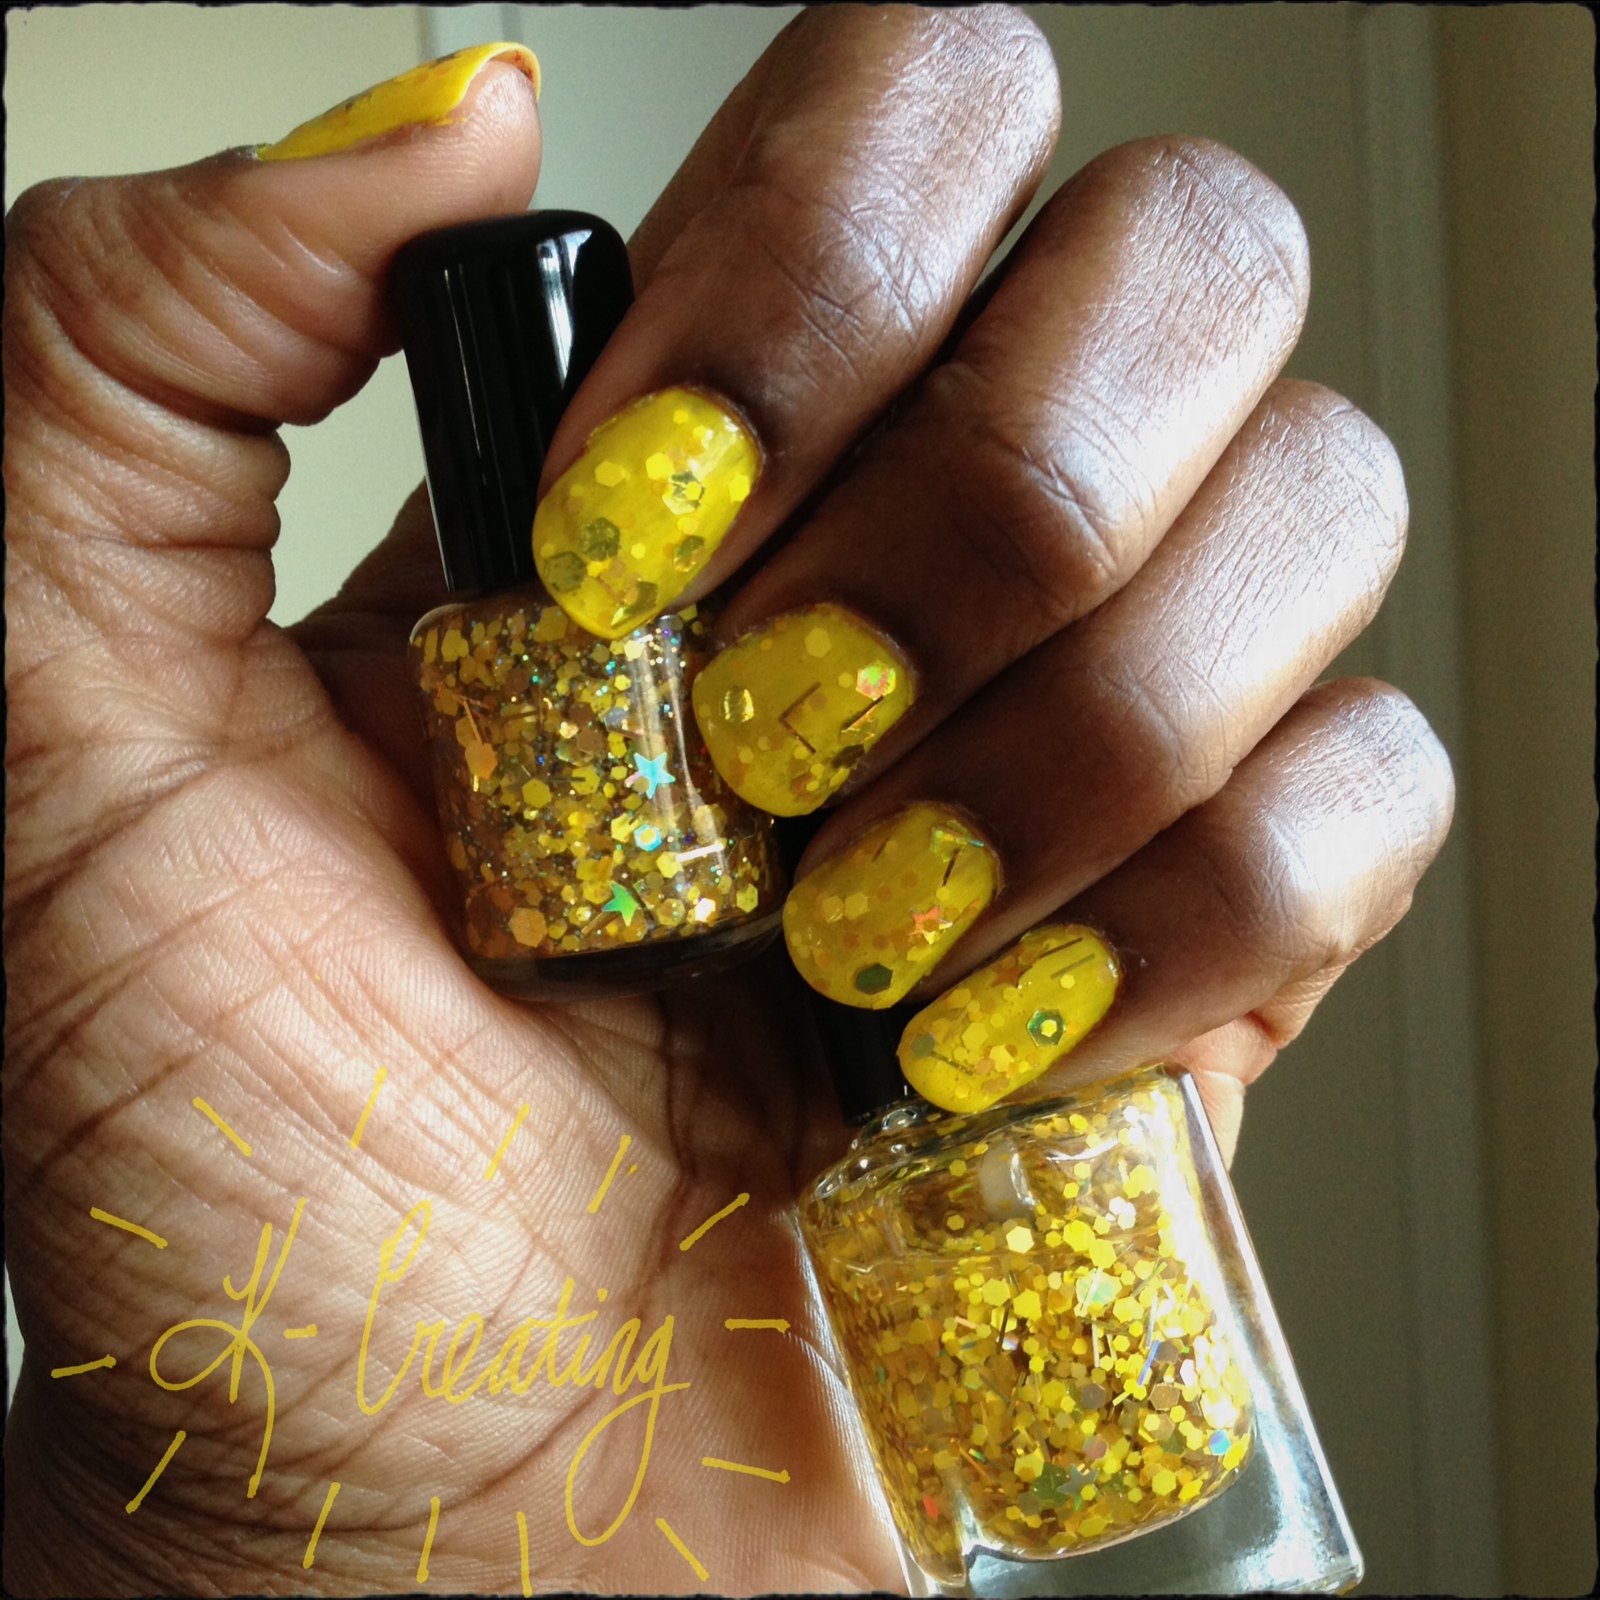
Living My Life Like It's Golden
This is a gorgeous selfie, a topcoat with assorted yellow and gold glitters. I also made a smaller version with a shimmer base; the large size has a clear base.
This is over a yellow creme by Ruby Kisses. I like this. A LOT!


Again, I just LOVE bright colors on my skin. This is a winner, a definite keeper.
I wish I could always be inspired to make something so pretty!
This is over a yellow creme by Ruby Kisses. I like this. A LOT!

Again, I just LOVE bright colors on my skin. This is a winner, a definite keeper.
I wish I could always be inspired to make something so pretty!
Tuesday, May 28, 2013
Dots I Wish Were Polka
I made a selfie of one-sized, white glitter. Hexes, although from a distance they can pass for circles. I think I added too MUCH glitter, as it comes off quite densely from the brush onto the nail. I think it looks better when there is not as much glitter on a nail.
I also tried something that's quite common for manicures, but which is also a first for me: a duotone nail--half hot pink, half red. I really like the way it looks under the selfie:

I'm going to have to do the duotone thing again; I really like it!
This manicure was inspired the OPI polish, Minnie Style. It's a glitter topcoat of equally sized red, white, and pink glitter. Although I have red, white, and pink glitter, I decided to do white glitter only. Of course, when brushing glitter "dots" on your nail, you get random, uneven placement, which I don't find unappealing. It's just that the dots on Minnie's dress are polka dots--evenly spaced--and the dots in my selfie can't make polka dots.
Still, I love this look so much!
Sunday, May 26, 2013
Pink and Blue Mani
I like this look...it's a pink and blue mani with an accent nail. The topper is a selfie of course, one of my favorites, whose pictures do NOT do it justice. It's a fun, confetti look. One of these days when I'm not using an iPhone as a camera, I'll take a GOOD picture of this topcoat so I can show it off. I use it so much that I guess it deserves better representation!

This is with and without flash. The blue is one of my Disco Brites (one of my favorite collections of all time) and the pink, I'm pretty sure, is Ruby Kisses Pink Flamingo.

This is with and without flash. The blue is one of my Disco Brites (one of my favorite collections of all time) and the pink, I'm pretty sure, is Ruby Kisses Pink Flamingo.
Friday, May 24, 2013
Yeah, Okay, No
Sometimes ideas seem okay while they're forming in my mind, or even once I write them down on paper. But once I mix them up and swatch them the outcome isn't always desirable. Take one of my latest selfies, for example (which I made with a couple of yesterday's glitters). It looked nice in the bottle, but on my nails, just...no. Maybe it's the polish color underneath (China Glaze C-C-Courage) that doesn't quite jive well with the glitter?

The thing is, after not liking it on my nails, I swatched it on a color wheel, over a few other colors, and it looked better. The thing is, I'm not in a hurry to reapply it. LOL. Sometimes this happens, though. I'm so happy to get a new shipment of glitter that I end up being in a hurry to use it, and I toss it into the mix all willy nilly. I guess I've got to be more patient.

The thing is, after not liking it on my nails, I swatched it on a color wheel, over a few other colors, and it looked better. The thing is, I'm not in a hurry to reapply it. LOL. Sometimes this happens, though. I'm so happy to get a new shipment of glitter that I end up being in a hurry to use it, and I toss it into the mix all willy nilly. I guess I've got to be more patient.
Thursday, May 23, 2013
Mani Mail
Today I received more glitter! A glitter day is always great. This order was mostly shapes, in such pretty colors and finishes, though.

This is my third day in a row of receiving manicure mail, but this is a trend with me. There will usually be a period of time--say a week or so--in which I order and receive a lot of goodies, but weeks if not months will go by when I don't order anything at all. Next on my radar is more base, since I only ordered a small amount, but I think I'm good for awhile.
Still, it sure is nice to open up a box of such loveliness!
Wednesday, May 22, 2013
Mani Mail: New Bottles
New bottles arrived today!
I ordered these "square" bottles, having previously only ordered the round ones from them, and I will review them here when I get a chance (or at least show bottles when filled):

Of course, they did come with caps and brushes.
I've been using the same bottles for a long time.
I recently ordered new bottles from a different supplier as well--in three different shapes and sizes.
The ones show above are smaller than the average-sized half-ounce nail polish bottle. I don't really mind. These are going to be a lot of fun to play with!
I ordered these "square" bottles, having previously only ordered the round ones from them, and I will review them here when I get a chance (or at least show bottles when filled):
Of course, they did come with caps and brushes.
I've been using the same bottles for a long time.
I recently ordered new bottles from a different supplier as well--in three different shapes and sizes.
The ones show above are smaller than the average-sized half-ounce nail polish bottle. I don't really mind. These are going to be a lot of fun to play with!
Tuesday, May 21, 2013
Mani Mail
I received a package today, consisting of [more] glamour base and these cute new bottles that I've been seeing all over Etsy. Because there was only a limited amount of them, I bought maybe thirty or forty of two different kinds. Also available from the supplier were smaller bottles with a cute pink cap, so I got a couple dozen of those as well.
I'm still working my way through the round bottles that I bought last year (and I have square bottles coming from a supplier soon), and I haven't even made a dent in the mini bottles I previously bought last year, but you can really never have too many bottles.
I've been pretty good about inventorying my glitters, which I've listed in a very detailed spreadsheet. Now I need to do the same to my bottles.
I will review these bottles once I've used them. They look very pretty though; the pink and white caps are a nice change from the black caps I've been using since I started making selfies.
Tuesday, May 14, 2013
Today's Mani
Today's mani: an unknown Color Club over a matte and satin glitter selfie:

I used a combination of bold and pastel glitters for this one, with a few flower shapes added to the mix. This one got a lot of compliments, and application is a breeze; I didn't really have to "fish" out the flowers.
A suggestion about making glittery selfies: add a lot of glitter to the bottle, stirring as you go along. And when you think you've added enough, add more. And then when you think you've added too much, add more.
You'll thank yourself when you're trying to apply it.
This isn't a hard and fast rule, only a suggestion. At times you'll want the glitter less densely packed in the polish, but for all intents and purposes, the more glitter the polish contains the better!
Thursday, April 4, 2013
A Note About Glitter Removal
I have heard lots of women say that they don't care for glitter nail polish because it's so hard to remove. And while that might be the case for a lot of ladies, it hasn't been proven to be the case with me, especially if I'm using a glitter topcoat as opposed to a regular jelly or creme polish with glitter in it.
When I apply glitter topcoats, selfies or otherwise, I usually use an undie color. So my application is like this: two coats of the undie polish, two coats of the glitter topcoat, and a quick-dry topcoat to finish it all off. This means that at any given time, I'm walking around with five layers of polish on my nails. That's pretty thick--and the quick-dry topcoats are thicker than usual, anyway. Because I have such a thick layer on my nails, it peels off quite easily, whether I want it to or not. I've noticed that certain topcoats (Sally Hansen Insta-Dri in particular) are more prone to make my manicures peel. And if I've done dishes, or any other work in which my hands got wet throughout the day, it peels that more readily at the end of the day. So typically before I go to sleep each night I'm able to peel off the glittery manicure, and all I need is just a quick swipe over the nails to rid them of the little pieces of polish that remain on the nail after I've peeled most of it off.
On the days when my polish doesn't start to lift off on its own, a gentle nudge of the polish at the tip or sides of the nail with a different nail will start the peeling process quite nicely!
Polish peeling from my index finger in the first shot; my index finger stripped cleanly and neatly of polish in the second shot:

I gently remove the polish that remains around the perimeter of the nail with an oil-based nail polish remover pad. This moisturizes the nail and cleans it all in one step!
When I apply glitter topcoats, selfies or otherwise, I usually use an undie color. So my application is like this: two coats of the undie polish, two coats of the glitter topcoat, and a quick-dry topcoat to finish it all off. This means that at any given time, I'm walking around with five layers of polish on my nails. That's pretty thick--and the quick-dry topcoats are thicker than usual, anyway. Because I have such a thick layer on my nails, it peels off quite easily, whether I want it to or not. I've noticed that certain topcoats (Sally Hansen Insta-Dri in particular) are more prone to make my manicures peel. And if I've done dishes, or any other work in which my hands got wet throughout the day, it peels that more readily at the end of the day. So typically before I go to sleep each night I'm able to peel off the glittery manicure, and all I need is just a quick swipe over the nails to rid them of the little pieces of polish that remain on the nail after I've peeled most of it off.
On the days when my polish doesn't start to lift off on its own, a gentle nudge of the polish at the tip or sides of the nail with a different nail will start the peeling process quite nicely!
Polish peeling from my index finger in the first shot; my index finger stripped cleanly and neatly of polish in the second shot:


I gently remove the polish that remains around the perimeter of the nail with an oil-based nail polish remover pad. This moisturizes the nail and cleans it all in one step!
Tuesday, March 12, 2013
Random Thoughts About DIY Polish
Just a few thoughts and musings about glitter polish and this blog...
- I should probably use a higher-quality camera--or spend time taking better shots of my polishes and manicures with the one I do use. (By the same token, I probably should do something about my cuticles.) I have several cameras that could easily produce "better" photos than my iPhone, but it's just so damn EASY to take pictures and quickly edit and upload them with the iPhone. Plus, I just love taking photos with my iPhone--I guess you could call me somewhat of an iPhoneographer. iPhoneograpolisher? iPhoneographaglitterist?
- I started this as a blog where I could just talk about my love of nail polish, and it evolved into a blog about DIY nail polish after a two-year hiatus. Sometimes I think I should blog about other stuff here as well--like my renewed interest in jewelry-making. I'm thinking about how to make the transformation. I have an actual domain that I'm not really doing anything with. But since I'm paying for it, I should be. Maybe I can incorporate it, somehow, into the blog overhaul if I decide that's what I want to do?
- I've been asked a couple of times why I don't sell the polish that I make online. Well, for one, the buying public is too fickle, and very hard to please. I see sellers on Etsy with sub 100% feedback and I worry for them. What did they do to lose that perfect rating? I know that when I spend my money on something, I can be rather unreasonable if I think I haven't received the very BEST service--although I'm getting better at it. Maybe I'm too afraid to have customers like myself, LOL. Also, the indie polish market is oversaturated at this point. If you didn't jump on that bandwagon over a year ago, I don't think you'd do well starting now. Too many great polish designers have been doing this for a long time, and they have a very loyal following and fan base. Any newcomers would face stiff competition because so many people would rather stick to the designers they're used to. Too, I sometimes have a hard time coming up with some different and creative. I own over a hundred unique glitters at this point, but that means nothing in the face of uninspiration. When you're doing this as a business there's a need to not only be creative, but be fruitful and produce many different, unusual, and unique creations. Your core audience just expects it. That's a lot of pressure. I'd rather just make the occasional bottle of polish when the mood hits, or when I think, "Hey, I've never seen a polish like this, let me whip it up right quick!" There are times when I sit down and can come up with multiple ideas in a session, but that's a rarity. I'd never make decent money trying to hawk my creations in the market.
- I'm going to have to get my glitter obsession under control. Whenever I tell myself, "You don't need to buy any more glitter--just use up the stuff you have!" I come across a new color, or finish, or shape, or size. (I never did have a lot of self-restraint!)
Thursday, March 7, 2013
Speckled Polish: The Trend
These speckled polishes by Ilumasqua are gorgeous. Too bad they cost so much, huh? Sixteen dollars a pop!

I attempted to replicate this on my own a few weeks back. While I didn't (or didn't bother taking the time to see if I actually did) have the same sizes and shapes of black glitter, I don't feel that's very important because the glitter I DO have can still make a polish with the same overall look and feel.
I decided to try it in a color that isn't represented in the actual collection (a pale yellow), and after a few minutes of playing around, I came up with this:

I don't have the actual polish on hand to compare it to, but from swatches I've seen, it's not that bad.
You wanna know the irony? I love polish so much that I just decided to break down, in the end, and buy a set of the Ilumasquas. But they're sold out, so I can't. I was unsure of whether or not I'd try another bottle--after all, the recipe does need a bit of tweaking--but now it seems that if I want it in another color, I'm going to have to.
Wednesday, March 6, 2013
An Orange Look
I feel some kind of way, honestly, about endorsing any brand in particular, but I must say that I like Ruby Kisses nail polish. They're so inexpensive and readily available from almost any beauty supply store. For this reason, they make excellent "undies" for "selfies"--"undies" being the solid color polish you wear up under the topcoat, which in my case is almost always glitter, and more often than not a "selfie," which is what I call a polish I make myself.
During the spring and summer, like most women, I prefer bold colors, neon colors, and pastel colors, and this orange, called Orange U Over? by Ruby Kisses, is a nice, bright jelly. And I love how bright colors just pop against my dark skin.
I layered Orange U Over? under a metallic glitter selfie, as seen below:

It's sealed with Sally Hansen Insta-Dri topcoat--and hopefully it will last a couple of days without peeling!
Thursday, February 14, 2013
Valentine's Day Manicure
I decided to go with a foil look in various shades of red and pink foil and nail polish. This is over an unknown Color Club:

One thing I have to say is that foil wears away very easily. While it's a cinch to remove with regular nail polish remover, if you do a lot with your hands, you'll find you won't need nail polish for it to come off. I'm always typing, or washing dishes, or washing my hands, so a lot of times manicures are very short-lived on me, but I don't mind. With all the nail stuff I have in my stash, I NEED an excuse to change my manicure every single day!

One thing I have to say is that foil wears away very easily. While it's a cinch to remove with regular nail polish remover, if you do a lot with your hands, you'll find you won't need nail polish for it to come off. I'm always typing, or washing dishes, or washing my hands, so a lot of times manicures are very short-lived on me, but I don't mind. With all the nail stuff I have in my stash, I NEED an excuse to change my manicure every single day!
Sunday, February 10, 2013
Nail Polish: Why Make Your Own?
With all the hundreds (if not thousands) of big-name store brand and indie polish makers out there, why in the world would you spend time (and money--supplies do add up) to make your own?
Well, there are pros and cons alike:
Well, there are pros and cons alike:
- You can make something that nobody else has, and it will be a true original unworn by anyone else (unless you publish the recipe). There's nothing like someone telling me, "I love your polish," and me replying, "Oh, thanks! I made it myself!"
- There are several wildly popular indie polish designers whose creations are either very hard to get or incredibly expensive. If you, like me, only make polish for your own personal use (and the occasional gift), there is absolutely nothing unethical about duping them (or making near-dupes) on your own, as long as you don't try to pass them off as the polishes that inspired you.
- If you're a crafter at heart like I am, you just like to make stuff! I love nail polish, and I love being creative, so this is right up my alley and my favorite new-found hobby. Not only am I doing something that I consider fun and interesting, it's also very useful, as I can wear what I make once I've made it.
- In the end, it's cheaper to make your own polish. With indie polish going for anywhere from $8.00 to over $20 per half-ounce bottle (and this isn't counting the bottles that get bid up into the hundreds on eBay), it's a lot more wallet friendly if you DIY. The only thing about making your own polish is that a small amount of glitter goes a LONG way, and if you're only making for personal use and not to sell, you will find that you'll have a LOT of glitter leftover. You may spend anywhere from $3 to $6 for an ounce of glitter--and realize that depending on a particular recipe, you can make several DOZENS of bottles of glitter with an ounce. You may find that you have glitter just sitting there until you can think of another way to use it. And if you're making only a few bottles at a time, you may never use it all, which could translate as wasted money. But assuming you only buy the amounts of glitter you need and use it all up, it's WAY cheaper than buying someone else's polish. Say you buy $48 worth of glitter--let's just roughly estimate that this will get you 12 half-ounce varieties of glitter--which you will be able to mix and match to your heart's delight. Say you spend less than $20 for roughly 16 ounces of base (which will give you a whopping 32 half-ounce bottles of nail polish). And let's say you pay fifty cents each and purchase 32 bottles. You've spent less than twenty dollars on bottles and polish. Altogether you've spent less than $100 for supplies, but you can make at least thirty-two bottles of polish. At less than $3 per finished bottle of YOUR OWN polish, this is roughly 1/3 the price of the average bottle of indie polish!

- While the individual elements of polish design are inexpensive (bottles are cheap, glitter is cheap, base is cheap, etc.), the cost of supplies can and will add up. Chances are, if you start off like I did with only a dozen types of glitter, you'll eventually want to buy new glitters--it can be addicting, and I've had to put myself on a "glitter ban" several times because I was buying too much and not using it fast enough. Likewise, once you have tried one type of bottle, you might see and want to try a different type or size.
Wednesday, February 6, 2013
Another Foil Look
Another foil manicure with a matte topcoat.

I have quite a few different matte topcoats. I don't know why I use them more. They look great over glittery polish as well.

I have quite a few different matte topcoats. I don't know why I use them more. They look great over glittery polish as well.
Saturday, February 2, 2013
Embracing the Foil Nail Trend
A company called Ciaté came out with a foil manicure kit. I saw it and had to have it. And once I got it and tried it, I realized I liked it--a lot. Browsing various blogs, I realized that many women have been doing foil manicures for ages. So I decided to go to a third party vendor and order additional foil and glue. I don't readily endorse many other companies on here, but I was pleased with the company I ordered the supplies from. And the third party foil and glue is a lot cheaper than the Ciaté kits!
This is one of my foil manicures. I'm pretty sure I used third-party foil for this:

I've probably foiled my nails five or six times by now with either the standalone foil or Ciaté foil, and suffice it to say, if I'm not wearing glitter on my nails these days, I'm wearing foil!
This is one of my foil manicures. I'm pretty sure I used third-party foil for this:

I've probably foiled my nails five or six times by now with either the standalone foil or Ciaté foil, and suffice it to say, if I'm not wearing glitter on my nails these days, I'm wearing foil!
Monday, January 21, 2013
Very Pink-ish

I don't have a name for this one, but it's made of several types of glitter.
Swatched with Revlon Sugar Glaze:

I like!
Friday, January 11, 2013
Polish Designing Tips and Tricks
Here are a few tips and tricks I've learned from trial and error that have made polish design and creation a LOT easier:
Happy glittering!
- Lint rollers are your friend. I buy the big rolls on handles that have the peel-away sheets. They're good for getting stray bits of glitter off your hands and clothes, and they're great for getting spills and large amounts of glitter from your work surface, if you don't...
- Prep your work area with newspaper. This makes for very easy cleanup, and it prevents nail polish spills from ruining your desk or table.
- Keep a window open! I learned this the hard way. There were months that went by when I didn't blend a single bottle of polish because doing so would give me horrible headaches. Then it dawned on me (much later than it should have): I didn't have proper ventilation. If you don't have plenty of fresh air circulating as you work with the polish base, the fumes will kill you.
- Really fine glitter can get in the air and you can inhale it, which you can imagine would irritate the hell out of your nose, throat, and lungs. Little paper masks that go over your mouth and nose are essential when using micro-sized flakes of glitter.
- Blend the glitter BEFORE adding it to the bottle. I use small zip-seal bags (snack sized) to mix glitter.
- Assemble the bottle and add the polish base FIRST.
- Funnels are essential, but purchased plastic funnels are unnecessary. While I have used them, I have also used paper funnels. If you have extra paper lying around, simply cut a rectangle of it, form it into a cone, tape it together, and cut a hole small enough to fit in the neck of the bottle, but large enough to allow plenty of glitter to fall into the bottle. This is a good way to recycle old paper you're just going to throw out, anyway.
- Little plastic scoops are available for adding glitter to base. Some frankeners have used straws that have the little scoops on the end, but I prefer the plastic ones that look like tiny kitchen measuring spoons.
- Add a few scoops of glitter to the bottle at a time, then stir before adding more, until you reach your desired amount of inclusions. You can use a toothpick to mix the glitter (being careful not to break it off inside the bottle), but I like using a cleaned, straightened bobby pin. They're so inexpensive that you can use one per bottle of polish (or, if you're doing more than one bottle using the same recipe, one per recipe) and then throw it out.
- After mixing the polish and putting on the cap, you can swatch it immediately! I use a nail wheel so that I won't have to keep applying polish to my own nails.
- Watch your polish carefully over the next few weeks to see how each type of glitter reacts in the bottle. If you...
- Make a note of all the glitters you used and the amounts, it will be easy to tell which ones you shouldn't use again if you notice any bad reactions.
- Early on, I made the mistake of ordering some types of glitter more than once. At a point I had fewer than thirty types of glitter, and I wasn't keeping track of everything, so it was easy to accidentally purchase more of a glitter I didn't need. I decided to log everything in a spreadsheet, and I keep track of color, finish, size, price, amount purchased, purchase price, and I have a column for "notes" for each type of glitter. This way, before I buy a new glitter, I check and make sure I don't have it already, or something very similar. Now that I have seventy or eighty unique types of glitter, the spreadsheet is indespensible!
Happy glittering!
Subscribe to:
Posts (Atom)