Wednesday, December 17, 2014

Ouch! Broken Glass!

While there was joy in getting all my nail polish and supplies back, there was NO joy whatsoever in seeing that so many of my empty polish bottles had suffered during the move.  A cursory glance when I opened up one of the boxes housing empty bottles told me that AT LEAST 1/4 of the bottles in that box had been broken.  When I brought this matter to the attention of the guy in charge of the movers, he assured me that not much could be done, since the bottles were moved in the container they were originally shipped to me in.


So much broken glass!  This is a problem I've never really encountered before, so I'm trying to figure out the best way to handle this.  I'm planning to just throw them all away.  I don't want to "play" with broken glass, whether it's trying to fish out the whole bottles from the wreckage of broken ones, or whether it's trying to clean glass shards and pieces out of the whole bottles.

So while I do have dozens of other bottles that didn't break, I'm going to need to replace the dozens that did break.  I really liked the bottles I'm going to have to discard, but I ordered them from another country (Canada, I believe) and of all the suppliers I've used for bottles, that company was one of the more difficult to work with, as far as shipping was concerned.  So, I've been looking around at other suppliers and in the past few days I've ordered "samples" of empty nail polish bottles from about three different sources I haven't used before.  Once the new ones come in and I test them out, I'll decide to either order more of them in bulk, or order more bottles in bulk from one of the suppliers I'd used in the past.

Wednesday, December 10, 2014

Red and Sparkly

One of my favorite types of glitter topcoats to make is holo glitter, especially if it's multi-colored.  In my opinion, it looks good with ANY color underneath.

This is my go-to red, Revlon Red.  The glitter mixture is assorted sizes of tiny hex glitter in metallic and holo colors!

I also had Revlon Red and this multi-holo glitter applied to my toes yesterday during my pedicure.  The technician said it looks just like Christmas!


Speaking of which, the next time I post, I hope to have some true Christmas creations to show!

Thursday, December 4, 2014

Reunited...and it Feels So Good!

The movers are here right now--they're delivering our possessions to our new home.

This means that I get to have, look at, and play with all of my nail polish again!

Of course, everything is still boxed away as I type, and some of the boxes I can't even get to, there are so many of them, but I'll be spending the next few days unpacking polish (as I locate the boxes, we had over 16,000 lbs of household goods and I'm sure my polish alone weighed HUNDREDS of pounds, so you can imagine how many boxes that is) and deciding which ones to wear next.

I've bought polish over the past few weeks--probably more bottles than I needed to.  But I take that back--you can never have too much polish!

I also have two shipments of glitter coming in from two different sellers, as well as more suspension base (which I also ordered during a Black Friday sale on Etsy)!

I think I'm good on bottles, for now, but pretty soon I'll need to order more empties, as I will have over a gallon of suspension base which will call for way more bottles than I have now.


Tuesday, November 25, 2014

Something New(er)

Will be getting back on track with the updates.  So much has been going on (a relocation) and I've been sort of...discombobulated.  Due to the move, almost ALL of my polish is in storage, as well as my polish-creating supplies, so I've been limited as to what I can do.  Since I knew I'd be removed from my personal belongings for WEEKS (four weeks and counting as of now, and I might not see my stuff again for at least two MORE weeks), I pre-filled eight bottles with suspension base and mixing beads, and I kept all my glitter with me so that I could play.

This is something I whipped up in the meantime.  I like it.  It went on a little...thick and sticky/goopy, but a nice topcoat of Seche Vite fixed any issues and it hardened up quite nicely!

This is my latest:


Suspension base, orange, white, and green glitter, and green shimmer powder.  I think the shimmer powder made it a bit thicker than I wanted it to be.  Next time I'll have to use less.  The white glitter consists mainly of tiny diamond shapes.  

I like it! 

It's two coats, on top of two coats of Orly's Highlight, which is a putty type of taupe color, an opaque creme.

Monday, November 3, 2014

Happy Halloween by way of The Haunted Mansion

The bad news: I just left my home of the past three years for the unknown!  I don't know where I'm going next or when I'm getting there.

The good news: I found some nail polish I really like...

Spent the previous week in Orlando, having a little Halloween-themed fun.  I decided to go for Mickey's Not So Scary Halloween Party, which coincided with another favorite Disney event of mine: the Epcot International Food and Wine Festival. 

I was able to sample tasty food, beer that REALLY hit the spot on a hot fall day, and lots of sweets and treats, a must for Halloween.  I also found nail polish that I didn't even know existed, the Haunted Mansion nail polish collection!  When I saw these in the gift store near the Mansion I had to buy not one, but two!


I don't have many colors like these in my nail lacquer collection, if memory serves me correctly.  They're dark, but shimmery colors, and I know they'll look interesting worn.

As an aside, I was ALSO able to FINALLY get my hands on a set of mini Pop of Minnie nail polishes, and a couple of other Beautifully Disney mini sets!

Friday, September 19, 2014

Faved!

Not much in this post, but I just thought I'd share with you some of my favorite creations from the past few months!  I never got around to naming or labeling these, but I did wear each of them a couple of times, and I must say, I liked them a lot!

Here they are below, as they appeared on my Instagram.

The first is based on a deck of cards.  Red, black, and white are common colors found in a standard deck of cards, and so are the suits--diamonds, spades, hearts, and clubs!  You can see all these shapes in the polish, along with tiny square and small hex shaped glitter, but the fun thing about them is the colors of the suits are untraditional!  There are white clubs, black diamonds, red spades...


I didn't name this one either.  It's pink and black and red and white--the pink glitter is in varying shades, and it's an homage to Minnie Mouse.  I added pink, black, and red "Mickey Mouse head" glitter shapes, and there are bar glitters in black and hot pink, as well as an assortment of circle, star, and hex glitters in shades of pink, white, black, and red! 


Below is one that consists solely of larger glitter shapes in all colors--stars, clubs, hearts, diamonds, skulls, flowers, etc.  I didn't give it a name, but I still love to wear it!  I basically call this nail art in a bottle.


 This one I will did a post about.  Large hex glitters in various bold, bright, summery colors--just right for spring and the coming summer!

Monday, June 30, 2014

Neutral + Sparkle!

Sometimes I like to wear a very understated color on my nails, but I still want them to sparkle.  This is where neutrals come in!  I don't wear neutrals often, but when I do I find they make an excellent background color for many glitters.  In this case, it's a holographic metallic chunky glitter topcoat I made several months ago.


The neutral--which is, of course, too light for my skin tone to be a true nude--is Brain Power by Formula X for Sephora.  I really like this color, and the Formula X line is a new and increasing favorite of mine as well.  I've mentioned that glitter typically peels off my nails in whole pieces, but this never happens when I use "The Formula."  Sephora has developed a set that works with their Formula X polishes, and the set consists of a nail prep/cleaner, a base coat, a color of your choice (complimentary), and a top coat.  I use my glitter topcoat after the nail color and before the Formula X topcoat, and it wears...and wears...and wears.  I don't have to worry about chipping or the polish peeling off!  I usually have one set in use and a backup; this is the backup (less the bonus polish, in this set it was a color called Extreme)


This is certainly one solution if you find that glitter manicures peel from your nails all too easily!

Sunday, June 29, 2014

New Summery Multi-Dot Topcoats

I've been making topcoats where all the glitter is the same size and shape for a while now (such as my homage to Minnie Style).  However, I've been seeing more and more of these polishes available commercial nail polish companies lately.  I have even purchased a few from Ciaté, Hard Candy, and Finger Paints.  However, it's always more fun and fulfilling for me to make my own!

This weekend I wanted to explore bright, summery colors.  As shown below, the polish with smaller glitter has red, hot pink, yellow, light orange, light blue, and light green hexes.  The polish with the larger glitter contains bright red, light blue, light green, pale green, yellow, and light yellow hexes.  Both are so pretty, and I've already worn them both!


In fact, right now, I'm wearing the one on the left.


This one was relatively easy to apply, and since I changed suspension base brands a couple months ago, I was able to get a good amount of glitter on the brush at once.  As a result, what is pictured is one coat over a reddish-orange L.A. Girl Disco Brites polish.

Friday, June 27, 2014

Four Years?

I've been blogging about nail polish and manicures for four years, but I simply never bothered to put the word out about it or advertise for it.

One reason was because I didn't know how long and how often I'd update, or whether I'd even keep this as a polish-related blog period.  But I've been around awhile, and I'll probably be around longer, and let's face it, I like coming up with manicure designs, glitter topcoats, and talking about nail polish, of which I own entirely too much.  The polish blogging world is over-saturated, with everyone and her mother posting manicures, but I like to think I offer something at least a little different: tips about designing your own nail polish topcoats, and ideas of how to wear them once you get them made.  I halfway want to include other topics on this blog, but for now, I guess it will be polish, and finally I'm going "live."  Honestly, I have fun doing what I do, and I love writing about what I do, and...well...I don't mind "sharing."

And speaking of sharing, there will be a nice giveaway when I reach one-hundred followers, so if you know anyone who likes all things manicure, spread the word!

In the meantime, here to visit and follow us on Facebook!

Tuesday, June 24, 2014

Something for the Patriotic

I was at a local Walmart not too long ago, and I saw a collection of Independence Day themed nail polish.  The Salon Perfect line, sold at Walmart, had released a limited edition set of nail polish colors and glitter topcoats all in shades of red, white, and blue!

 A press photo for the collection, called "Paint the Town Red White & Blue" (my main concern, naturally, being the glitter topcoats) are below:
At the store, it was the glitter topcoats I surreptitiously took a photo of:
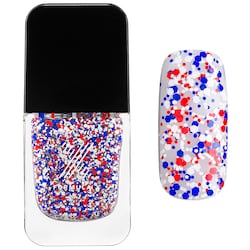
I decided not to purchase them, although I'd been wanting another red, white, and blue topcoat for awhile now.  I'd been toying with the idea of buying the one from Sephora, but to tide me over I made my own last week--but more about that later.

Since I have a ton of glitter already, and of course hundreds of empty bottles, caps, brushes, and suspension base at my disposal, I decided to make my own set of red, white, and blue topcoats, inspired by both this one from Sephora called Liberty:
and the set of six red, white, and blue glitter topcoats from Salon Perfect.

Here they are, yet unnamed; I finished designing them two days ago:
The first one shown was made a week or so ago while I was still deciding whether or not to buy Liberty.  The other five I made over the space of a day.  Click on the photo to enlarge.

I need to come up with names for these, but so far, I'm very pleased with them!  

Going from l - r, the polishes contain:

1.   tiny matte red hex glitter, matte blue star-shaped glitter, tiny white matte square glitter, matte bar glitter, tiny matte white hex glitter, tiny matte blue hex and square glitter, and holographic shimmer glitter

2. a ton of equal-sized tiny matte white, matte blue, matte red, and holo red glitter

3.  tiny blue, periwinkle, red, and white stars and holographic shimmer

4.  metallic red, blue, and silver bar glitter

5. holographic red, silver, and blue moon and star glitter, and multi-colored, multi-sized holographic glitter (the only polish that contains colors other than red, white, blue, or silver)

6.  tiny matte red bar glitter, tiny matte white rectangle glitter, and tiny matte square bright blue glitter

I really LOVE these and I can't wait to wear them in flag-themed manicures!